In this Pillars of Eternity 2: Deadfire Build Guide we’re going to be taking a look at the Sage Class, which is a mixture of Wizard and Monk. I’ll be providing information on Attributes, Weapons, Armor, and most importantly, what Abilities to take and how to use them. Please keep in mind that this is my Sage Build, and there are plenty of ways you can build this class, and this is not the only one. If you’re new to Pillars of Eternity 2, or you just love creating characters as much as I do, then this Guide is for you. Please note that this Build Guide was updated for the 5.0 version of the game, as well as 1.01 on console (as of January 20th, 2020), and works with both Real Time with Pause and Turn-Based.
Sage Build Guide
The Sage combines the defensive capabilities of the Wizard with the fast attack speed of the Monk for a potent blend of both offense and defense. Unlike most Monks who fight Unarmed, the Sage fights Two-Handed with a Pike, dealing devastating damage to all those around it. This synergizes well with many Monk Abilities that use Wounds as their resource, because most of them are Primary Attacks, and are less effective when Unarmed than when Two-Handing.

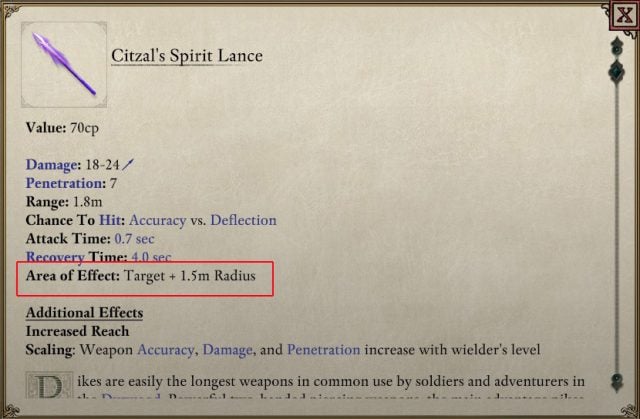
This Sage Build utilizes the Conjuration spell of the Wizard Class called: Citzal’s Spirit Lance in order to summon a Pike that does AoE damage on each attack, making it one of few Weapons that can do this. Because it attacks in an AoE we are able to capitalize on the Monk’s Swift Flurry ability to ridiculous levels of magnitude, as each time it triggers you will stab each enemy in an AoE which prompts more opportunities to proc Swift Flurry. But it doesn’t stop there!
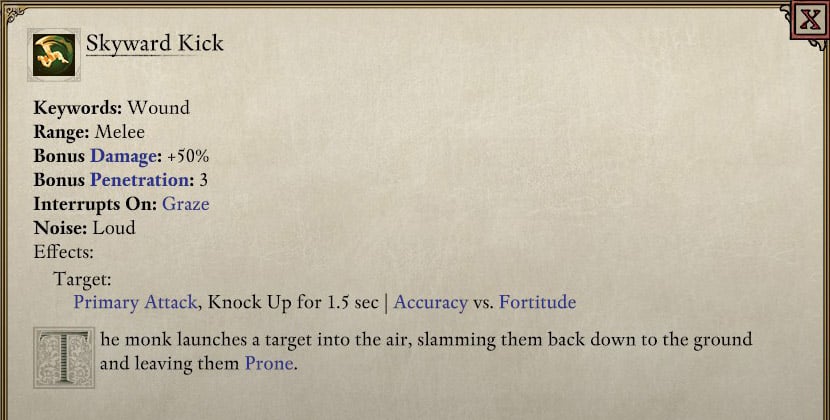
As mentioned above the Monk has many Abilities that cost Wounds that are Primary Attacks and generally overlooked by many Monk players. However, because we are Two-Handing with this Build we are able to use them to greater effect! Raised Torment for example will now Stun all enemies around you, or use Skyward Kick for 50% increased Damage and +3 Penetration on all enemies around you, knocking them Prone. In short, if you’ve ever dreamed of playing a Two-handed Monk, this is the Build for you!
Sage Subclasses (No Subclass and Shattered Pillar)
I chose No Subclass for my Wizard, frankly because you need Abilities from Illusion, Conjuration and Enchanting, and you cannot specialize without losing one of those Schools. You could choose Conjurer but you’d miss out on Llengrath’s Displaced Image, which is an amazing ability. However, you don’t really gain much in exchange for this, so I don’t think it’s worth it, as you don’t spend much time casting. Blood Mage is another solid choice, if you don’t mind losing out on Empower.
For my Monk Subclass I chose Shattered Pillar. I actually spent most of my time playing as Helwalker, but I realized pretty quickly that you don’t get hit often enough and you’ll soon run out of Wounds. As a Shattered Pillar Monk your AoE attacks will fill your Wounds to max with nearly every swing, so you’ll have an infinite supply of them. In addition, this will cause Rooting Pain to trigger in huge bursts as you repeatedly gain 3 to 5 Wounds at once.

Sage Weapons and Armor
As mentioned above the weapon you want to use for this Build is Citzal’s Spirit Lance, because it hits in an AoE for ~50% of the damage to the initial target each time you attack, and has a pretty wide AoE (which we can boost with high Intellect). When you trigger Swift Flurry you will AoE all targets around you, usually triggering Swift Flurry again, and so on. This results in catastrophic damage, generally killing everything around in seconds. However, you cannot unlock this Ability until level 13 so you will have to use something else earlier on in the game. I strongly suggest going Unarmed, but you could also use Concelhaut’s Parasitic Staff, which heals you when you damage enemies. Note that the Spirit Lance is technically a Pike, and will give the benefit for the Weapon Ability if you are proficient with Pikes when wielding it.

Armor-wise you want to use any that doesn’t incur a Recovery Time penalty. You’ll be able to give yourself +5 Armor, so even if you only have 3-5 Armor, you’ll still have a decent amount. Keep in mind that many Hits will be turned to Grazes with Llengrath’s Displaced Image, resulting in less Penetration, so you can get away with less Armor. You’ll also have incredibly high Deflection, so you shouldn’t even be getting Hit often. If you’re playing Turn-Based you can use Medium and Heavy Armor, as your Recovery Time is less important.
Sage Abilties
In this section we’re going to cover the “must have” Sage Abilities for this Build. You are free to pick and choose which you want outside of these because everyone’s style of play is different and there is no perfect way. However, these ones will be needed for this Build to work effectively.
Wizard Abilities
 Spirit Shield – A good early game source of Armor and Concentration. Best taken during Character Creation.
 Mirrored Image – A good way to boost your Deflection until you gain Llengrath’s Displaced Image at the next Power Level. Note that they do not stack.
 Infuse With Vital Essence – This ability buffs your Intellect and Constitution giving you a wider AoE radius and bumping your HP a bit.
 Llengrath’s Displaced Image – This is your go to Deflection and damage reduction buff for most of the game. It’ll help keep you alive long after you should have died, and it has a very long Duration that is only boosted further by our high Intellect.
 Ironskin – Later in the game this will replace Spirit Shield as your go to Armor buff. +5 Armor is nothing to sneeze at and makes you nearly unkillable combined with your other buffs.
 Citzal’s Spirit Lance – This spell obviously makes this Build work, so it’s a must have. Take this the second you reach level 13!
 Arcane Reflection – This spell makes you reflect spells back at casters, which is just awesome period. Take it and enjoy it!
 Wall of Draining – This ability allows you to maintain your buffs even longer, and debuffs enemies at the same time.
 Martial Caster – This will help you summon your Lance faster, but not a whole lot faster. Still you can never summon it fast enough, so we take it
Monk Abilities
 Swift Strikes – Take this one during Character Creation to speed up your Casting and Attacking. Later we’ll upgrade it to Swift Flurry for incredible damage.
 Lesser Wounds – This will allow you to build up Wounds faster, which allows you to spend them faster. This becomes much more important later on once you have Rooting Pain.
 Two-Handed Style – This will increase your damage when using your Lance, which is great.
 Swift Flurry – This upgrade makes our Crits give us a chance to strike again, which works amazingly with the Spirit Lance. AoEs for days!
 Torment’s Reach – This ability hits the target and hits around it in an AoE. This is great early on, but shines even more later in the game.
 Soul Mirror – Chance to reflect Ranged attacks if they miss you. You’ll be reflecting a lot of damage with this Build.
 Duality of Mortal Presence – This will allow you to gain +5 Intellect or Constitution per Wound. We will only have a max of 5 as a Shattered Pillar Monk, however we will still benefit from the AoE size it will provide before each attack.
 Thunderous Blows – This ability gives us +5 Might and +2 Penetration for only 2 Wounds. It’s a great way to further boost damage and use up some Wounds at the beginning of combat so we can gain more.
 Rooting Pain – This ability deals damage in an AoE around the Monk every time they gain a Wound. Since you can control the rate you gain them, you can proc this 4 or 5 times at once, resulting in crazy damage.
 Raised Torment – This upgrade Stuns enemies you hit, making it possible to Stun everyone around you. Get it and enjoy.
![]()
![]() Turning Wheel – This wont be as effective as in some Monk Builds because you’ll constantly be draining your Wounds and you have a lower max cap, however, you will gain some benefit from it as you Wounds will be full often when attacking.
Turning Wheel – This wont be as effective as in some Monk Builds because you’ll constantly be draining your Wounds and you have a lower max cap, however, you will gain some benefit from it as you Wounds will be full often when attacking.
![]()
![]() Skyward Kick – This ability allows you to interrupt and knock Prone everything around you for +50% increased damage and +3 Penetration. You will fall in love with this when using the Lance. Trust me!
Skyward Kick – This ability allows you to interrupt and knock Prone everything around you for +50% increased damage and +3 Penetration. You will fall in love with this when using the Lance. Trust me!
 Hearbeat Drumming – An additional 25% chance to attack again after Critical Hitting in melee. This is just the icing on the cake at this point, because it just makes this Build more absurdly powerful.
Sage Attributes
In this section we’ll cover Attributes for the Sage, and explain a bit about each and why we need it or why it’s important. Sages need Dexterity, Perception and Intellect, with perhaps a dash of Constitution depending on how much tanking they will be doing. Dexterity helps with their Recovery Time and Cast Time. Perception helps with the Accuracy of their attacks, which they will need because they are Two-Handing and not getting the bonus from Transcendent Suffering. Intellect helps with the Duration of their many buffs, but more importantly, the AoE size of their Pike attacks. Hitting more targets = good. Might and Resolve are not really needed and I would dump Resolve for more points. If you’re playing Turn-Based you’ll want to dump Dexterity in favor of Might or Constitution, since you don’t need to worry about Recovery Time.
 Dexterity is important for casting your many Buffs quickly, attacking quickly and summoning your Lance as quickly as possible. With the right setup you can change Stun enemies and they will never be able to attack you, if they live that long. This Attribute should be at max or near max (16 or 17).
 Perception is needed to make sure you not only Hit your targets, but also Crit, triggering Swift Flurry. Because this Sage Build uses Two-Handed, you will have less Accuracy of than that of an Unarmed Monk. This makes this stat even more important than usual, and it should be at max or near max if possible.
 Intellect not only helps with the Duration of the tremendous amount of buffs we have, including our summoned lance, but also with the AoE size you will strike in. The more enemies you damage, the more likely you will trigger Swift Flurry, so this can boost damage by a good margin. In addition, you can kill large groups of enemies quickly being able to reach them all, so you’ll want this at least 15, and higher if you can.
Sage Final Tips
As far as Races go, I really like Nature Godlike for this Build. Your Might, Dexterity and Constitution will all be buffed constantly, so you will gain the 1 extra power level all the time when in combat. This is great because it will increase the Damage, Accuracy and Penetration of your Spirit Lance, and you’ll need that. Hearth Orlan is also not a bad choice for the extra Crit chance, which helps to proc Swift Flurry more often.
Remember to use your Wounds on attacks like Raised Torment, Skyward Kick, and Force of Anguish. You want to spend your Wounds as fast as you can, because you will hit your limit of 5 constantly and you’ll just waste them otherwise. You will be striking in an AoE with these and so will replenish them instantly. Also remember you deal damage with Rooting Pain each time you gain a Wound so you want to spend them and build them up fast for max efficiency.
You don’t want to take any other spells at level 5 of Wizard because you need all your casts for the Spirit Lance. Also pay attention to the spells you select, because you only have 2 of each Power Level, and you might need to cast something twice. For example, Ironskin is great at giving armor, but Flame Shield is on the same Power Level, so if you cast both, when Ironskin runs out you’ll be getting hit much harder. Keep things like this in mind when choosing spells and try to plan ahead.
Lastly, you can use the Spirit Lance with other Classes than Monk to make some extremely powerful Builds. Battlemages can use this with Cleaving Stance to AoE everything repeatedly when they get a kill. Spellblades wishing to be Riposte tanks can use it to great effect by hitting everything in an AoE when they Riposte. Add on top of that they can Gouging Strike to Blind everything around them and bleed them for Raw Damage, and it becomes a deadly combination. Hierophants can use Soul Annihilation in an AoE…you heard me…in an AoE!

Stay tuned for more Pillars of Eternity 2 Build Guides through out May, as we make some more specific Guides covering some of the most fun and interesting combinations we could find. If there is a specific combination you would like to see, please post in the comments and we will do our best to accommodate!
7 responses to “Pillars Of Eternity 2 Deadfire Builds Guide: Sage (Spirit Lancer)”
Would this be a good build still in the final iteration of the game. Started playing it yesterday 2023 so it’s final patch state.
Hi is this build still viable with the spirit weapon nerf? Also would this work with enchanter wizard subclass?
Also wondering if shattered pillar monk is still the best sub rather then helwalker?
Thanks
Hi is this build still viable with the spirit weapon nerf? Looks decent to fill the offtank slot in my party.. Would enchanter wizard subclass work for this build? And is shattered pillar monk still best subclass for monk? Thanks
I would actually go the other way, and learn all of the critical spells, that way I can change out Books as needed for special situations, rather than lose my critical spells when switching stuff around.
Hi great build! I wanted to point out that you can buy the Llengrath’s Martial Masteries grimoire in The Dark Cupboard shop (Periki’s Overlook, Neketaka). It will have 6 of the spells that you consider necessary for this build (Spirit Shield, Infuse with Vital Essence, Llengrath’s Displaced Image, Ironskin, Citzal’s Spirit Lance, and Arcane Reflection). I would suggest that you could not select these spells at level up and use the points elsewhere.

Hah, darnit, I should read the other posts first :headsmack
Regards,
-Toadbat
Hi great build! I wanted to point out that you can buy the Llengrath’s Martial Masteries grimoire in The Dark Cupboard shop (Periki’s Overlook, Neketaka). It will have 6 of the spells that you consider necessary for this build (Spirit Shield, Infuse with Vital Essence, Llengrath’s Displaced Image, Ironskin, Citzal’s Spirit Lance, and Arcane Reflection). I would suggest that you could not select these spells at level up and use the points elsewhere.
Regards,
-Toadbat
Hey, great build! I just started my first playthrough with this. I think one way to gain additional monk skills is to invest in Llegrath’s Martial Masteries grimoire (can be bought at Dark Cupboard) which offers all the Wizard skills needed for this build.
Log in to leave a Comment